JWT token authentication with Angular and Web Api

Introduction
This article shows how a ASP.Net core Web Api project can implement user authorization with a JWT token sent from an Angular web application.
JSON Web Tokens are an open, industry standard RFC 7519 method for representing claims securely between two parties.
JWT token in short
In its compact form the JWT is a string containing three different parts:
- Header. The header contains the type of the token and the signing algorithm. It’s base64 encoded.
- Payload. The payload contains the claims. Claims are statements, in this article it’s claims about the user. It can be the username, rolet etc. The header and payload are base64 encoded, so note that any public claims can easy be made visible.
- Signature
The signature contains the signing of the header and payload. When the HMAC algorithm is used the formula is like the following:
HMACSHA256(
base64UrlEncode(header) + "." +
base64UrlEncode(payload),
secret)
In words; the HMAC function takes as input a string concatenation of the base64 encoded header, a dot, and the payload. The output is the signature. So the complete token has the form:
[headerString].[payloadString].[signatureString]
For a longer introduction consult https://jwt.io/introduction/
Why use a token?
Token use has some advantages over technologies like cookies. It’s signed, it’s not sent automatically, it’s less susceptible for CSRF attacks, it’s scalable and more natural to use for non-web client applications like mobile apps.
Creating the WebApi and testing the WebApi
The WebApi is created with the dotnet cli and the .Net Core framework. The package “Microsoft.AspNetCore.Authentication.JwtBearer” is needed as a package reference in the project file.
A controller class with the name AccountController is added. Here the POST method ‘Logon’ exposes an endpoint which accepts a LoginModel with a user name and password.
[AllowAnonymous]
[Route("Logon")]
public async Task<IActionResult> Logon([FromBody] LoginModel loginModel)
{
    if (loginModel == null) return Unauthorized();

    var userInfo = await FindUserInDatabase(loginModel);
    if (userInfo == null)
    {
        return Unauthorized();
    }
    else {
        var tokenString = BuildToken(userInfo);
        return Ok(new { Token = tokenString });
    }
}

public class LoginModel
{
    public string UserName { get; set; }
    public string Password { get; set; }
}
The account for username/password combination is usually looked up in the database. If it exists the method BuildToken is invoked to construct the token:
private string BuildToken(UserInfo userInfo)
{
    var key = new SymmetricSecurityKey(Encoding.UTF8.GetBytes(_config["JwtToken:SecretKey"]));
    var credentials = new SigningCredentials(key, SecurityAlgorithms.HmacSha256);

    var claims = new List<Claim>()
    {
        new Claim(JwtRegisteredClaimNames.Sub, userInfo.UserName),
        new Claim(JwtRegisteredClaimNames.Email, userInfo.EmailAddress),
    };

    //AddRoleClaimsToToken(userInfo, claims);

    var token = new JwtSecurityToken(
        issuer: _config["JwtToken:Issuer"],
        audience: _config["JwtToken:Issuer"],
        claims: claims.ToArray(),
        expires: DateTime.Now.AddMinutes(90),
        signingCredentials: credentials);

    return new JwtSecurityTokenHandler().WriteToken(token);
}
Here the interesting things happen. The secret key with which the token is to be encrypted is read from the config file and provided to a SymmetricSecurityKey object. After this it’s passed to the SigningCredentials object where also security algorithm is passed in. In the example this is HmacSha256.
Consequently the claims are being set. One for the user name and one for the email adress. Note that these claims are public. Optionally you can also add user roles to the token, but it’s up to you whether to put this as public information. In the example the commented line can be uncommented to put the roles in the token.
The final step is to create a JwtSecurityToken. In the constructor all needed information is passed, including the claims. The WriteToken method outputs the token string.
This string can be verified and inspected on https://jwt.io.
The rest of the code of the WebApi is the example WeatherForecastController which was generated with the project, and the Startup class.
The startup class is important and contains Jwt related configuration. For brevity it’s not discussed here, but the code is on github.
Creating the Angular client
The WebApi can be consumed with any web client. In this example a sample client is created with Angular. The Angular CLI together with ‘ng new’ command created the project. A LogonComponent is added to logon. The part which invokes the Logon method on the AccountController of the WebApi is the following:
  LoginAndGetToken(user: User) {
    return this.httpClient.post<Token>
      ("https://localhost:44341/account/logon", user);
  }
It reads the user/password from the web page and passes it in the request body:
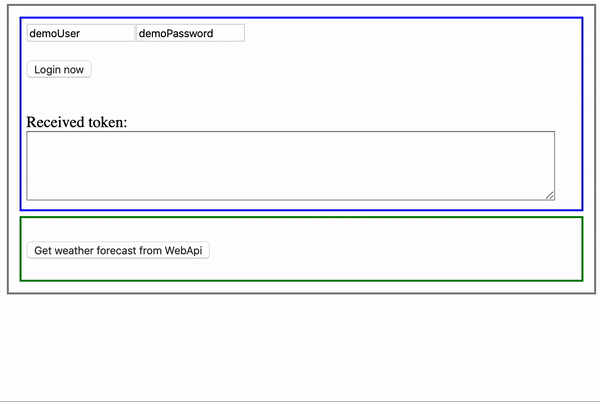
{"username":"demoUser","password":"demoPassword"}
The WebApi returns a token. In the example the angular client writes the token to local storage so the WeatherDisplayComponent can use it. This component calls the WebApi with the code below:
GetWeatherForecast() {
    let parsedToken = localStorage.getItem('auth_token');
    let tokenHeaderString = 'Bearer ' + parsedToken;

    let headers: HttpHeaders = new HttpHeaders();
    headers = headers.set('Content-Type', 'application/json; charset=utf-8')
        .set('Authorization', tokenHeaderString);

    return this.httpClient.get<WeatherForecast[]>
        ("https://localhost:44341/weatherforecast", { headers });
  }
Important to note here is that to the http request to the WebApi a request header with information about the authorization method is added with the following format: ‘Authorization: ‘ followed by ‘Bearer’ + the token string:
Authorization: Bearer eyJhbGciOiJIUzI1NiIsInR5cCI6IkpXVCJ9.eyJzdWIiOiJkZW1vVXNlciIsImVtYWlsIjoidGVzdEB0ZXN0LmNvbSIsImV4cCI6MTU4MzEwNjA0NiwiaXNzIjoiaHR0cHM6Ly93d3cuaWN0bW90aW9uLmNvbS9ibG9nIiwiYXVkIjoiaHR0cHM6Ly93d3cuaWN0bW90aW9uLmNvbS9ibG9nIn0.R1v6mKIOT9AzknoLKg_gNzB1Hf3s1yIxRFXTJLbpGlQ
In this way the WebApi can read the token:
[HttpGet]
[Authorize]
//[Authorize(Roles="Regular")]
public IEnumerable<WeatherForecast> Get()
{
    var random = new Random();
    return Enumerable.Range(1, 5).Select(index => new WeatherForecast
    {
        Date = DateTime.Now.AddDays(index),
        TemperatureC = random.Next(-20, 55),
        Summary = Summaries[random.Next(Summaries.Length)]
    })
    .ToArray();
}
The attribute [Authorize] makes sure a valid token is required, and returns the http code 401 Not Authorized if the token is not there or incorrect. This attribute can also can restrict access to certain roles, as the comment shows, provided that the WebApi or token provider puts the roles in the token.
The working angular UI will work like this:
Conclusion and further
The article shows how the WebApi can be secured with JWT tokens. The WebApi constructs a token, the client adds the authorization request header with the token to a request, which is decoded server side with the [Authorize] attribute. Further steps to explore are OAuth 2.0 tokens and online token providers like https://www.auth0.com.
Links
- Source code example
- Http://www.jwt.io validate your tokens here.
- Rfc7519
- Jwt vs cookies
- Scalable token authentication