Using NestJs to create Azure Functions backed by Sql Server

Introduction
This article shows how NestJs can be used to create a modern serverless web application using Azure Functions and Sql Server.
What is NestJs
NestJs is a framework for NodeJs. It’s built on top of Express, it brings TypeScript and makes things easy with familiar concepts like controllers. Next to this it can be used to create a serverless architecture.
Why NestJs?
Azure functions can also be made without NestJs. They can be built with just JavaScript or other languages, so why use NestJs to create a serverless backend?
- NestJs/TypeScript is easy to use compared with NodeJs/JavaScript. Especially for .Net developers and non-JavaScript fanatics.
- NestJs uses TypeScript. If the front-end is built with TypeScript only one language is needed in the development team.
- NestJs has good documentation.
The example application
The example application will be a word guessing game, to guess if a french word, a noun, is masculin or feminin. For example, ‘le mot’ is a masculin word and ‘la ville’ is feminin. The first objective is to create a create a NestJs project.
Getting ready and creating the Nest project
Before you can start
- NodeJs (preferrably the lts version)
- NestJs cli (npm install -g @nestjs/cli)
- Azure functions core tools
- Azure cli
Let’s start
mkdir lela
cd lela
nest new lela-server
cd lela-server
Implementing the controller
This paragraph a simple NestJscontroller is created.
First create a module by running the following command in the root project folder:
nest generate module words
The word.entity.ts:
export class Word {

id: number;
word: string;
description: string;
masculin: boolean;
feminin: boolean;

constructor(word?: Partial<Word>) {
    Object.assign(this, word);
  }
}
Now in the root project folder the controller can be generated with the following command:
nest generate controller words
Note that NestJs assumes you want the controller to created in the words module, reason be it has the same name.
words.controller.ts
import { Controller, Get } from '@nestjs/common';
import { Word } from './word.entity';

@Controller('words')
export class WordsController {

    @Get('example')
    getExampleWord() {
      return this.createExampleWord();
    }

    private createExampleWord(): Word {
      var myWord = new Word();
      myWord.word = "coude";
      myWord.description = "French word for elbow";
      myWord.masculin = true;
      myWord.feminin = false;
      return myWord;
    }
}
Add the ‘api/’ tot the url in main.ts to add the ‘api/’ part in the url of the api:
async function bootstrap() {
  const app = await NestFactory.create(AppModule, { cors: true });
  app.setGlobalPrefix('api');
  ..
Now the api can be tested with the following command:
npm run start
curl http://127.0.0.1:3000/api/words/example
Moving from NestJs Api to Azure Function
This is an important step. So far, just a regular server side NestJs application with a word controller has been build.
With only a few changes, this NestJs application can be changed to run as an Azure Function.
nest add @nestjs/azure-func-http
The changes made by this adding this package can be seen in this git commit.
In the file local.settings.json the following line can be removed: “AzureWebJobsStorage”: “”,
The function can be tested locally with the following command:
npm run start:azure
This command executes the ‘func host start’ from the azure function core tools. It starts the function locally with the azure function simulator.
Testing and debugging
The local function now an be tested with:
curl http://localhost:7071/api/words/random
Also great is the function can be debugged easily now. Example configuration settings in VsCode are: .vscode/settings.json
{
    "version": "0.2.0",
    "configurations": [
        {
            "name": "Attach to Node Functions",
            "type": "node",
            "request": "attach",
            "port": 9229,
            "preLaunchTask": "func: host start"
        }
    ]
}
Publishing the function to Azure
The next step is publishing the function to azure. In order to do so a resource group and storage account is needed:
# Login to Azure, should only be needed once
az login

# Create a new resource group
az group create --name [rg-mygroup] --location [westeurope]

# Create a storage account. The name must be unique in Azure. It's needed for logging, running etc.
az storage account create --name [stmystorage] \
                          --resource-group [rg-mygroup] \
                          --kind StorageV3
When the resource group and storage account are created, or if they already were there, a function app in Azure can be created:
# Create the functionapp, and link it to the resource group and the storage account. The name must be unique in Azure.
az functionapp create --name [my-func-app-name] \
                      --resource-group [rg-mygroup] \
                      --consumption-plan-location [westeurope] \
                      --storage-account [stmystorage] \
                      --functions-version 3
Deploy to azure
func azure functionapp publish api-func-lela --publish-local-settings
The –publish-local-settings flag pushes setting values from local.settings.json to the Azure Function app setting.s
After this it can be tested with the azure url:
curl https://[my-func-app-name].azurewebsites.net/api/words/
Deployment with VSCode
There is visual studio code extension which comes in handy here. It’s ‘Azure functions for Visual Studio Code’ This extension makes deployments to Azure easy and is worth checking out.
Function App Settings
The function app has several settings. They can be viewed in the https://portal.azure.com under the function configuration, or they can be listed with the Azure CLI command
az functionapp config appsettings list --name [my-func-app-name] --resource-group [rg-mygroup]
They can be changed with the azure cli. For example if you want to disable the default zip deployment you can do the following:
az functionapp config appsettings set --name [my-func-app]\
                                      --resource-group [rg-my-group] \
                                      --settings "SCM_DO_BUILD_DURING_DEPLOYMENT=true" "WEBSSITE_RUN_FROM_PACKAGE=false"
The setting can also be incorporated in the local.settings.json file.
Choosing storage: Azure SQL database
The words of the game need storage in a database. Normally in an autoscaling architecture with Azure Functions and a lot of table data, Azure Tables might be a logical fit. But its querying options are limited, as are the ways to upload data. In this example just one table is needed and Azure Sql Server will be used. Azure Sql Server also has a ‘serverless’ auto-scaling option, however in this example the the cheapest and cost predictable basic tier database is chosen.
The Azure Sql database can be created with the Azure Cli (note that the storage account from earlier is reused):
az login

# Create a logical server in the resource group
az sql server create \
    --name [my-db-server] \
    --resource-group [rg-mygroup] \
    --location westeurope  \
    --admin-user [myadminuser] \
    --admin-password [mypassword]

# Configure a firewall rule for the server to opening up to localmachine.
# Enter the ip4 address here for startip/endip
az sql server firewall-rule create \
    --resource-group [rg-mygroup] \
    --server [my-db-server] \
    -n AllowYourIp \
    --start-ip-address [startip] \
    --end-ip-address $[endip]
A basic database can be created with the command:
az sql db create \
    --resource-group [rg-mygroup]\
    --server [my-db-server]\
    --name [my-db-name]\
    --edition Basic \
    --zone-redundant false
Notice also the Mssql for VsCode extension. This extension gives another way to access the Azure SQL database.
Extending the application
With the Azure Sql Server ready, the function app can be extended with a POST method, which stores a new word in the Azure SQL database. This paragraph shows how to store data in Azure Sql with help of TypeOrm.
TypeOrm
TypeOrm is an Object-Relationship-Mapper (ORM). It is written in TypeScript and inspired by mature frameworks like Hibernate and Entity Framework. It supports many open source database like MySql, PostgreSQL but also MS Sql Server.
Read the documentation here: https://github.com/typeorm/typeorm
In order to install it with mssql type, use the following command:
npm install --save typeorm mssql
Creating a database module
First thing to do is to create a NestJs database module like explained in the official NestJs docs. In the root project folder:
nest generate module database
Create the database.providers.ts file in the folder of the database module:
import { createConnection } from 'typeorm';

export const databaseProviders = [
  {
    provide: 'DATABASE_CONNECTION',
    useFactory: async () => await createConnection({
      type: 'mssql',
      host: 'my-azure-database-server.database.windows.net',
      port: 1433,
      username: 'my-db-account',
      password: 'my-password',
      database: 'my-database',
      entities: [
          __dirname + '/../**/*.entity{.ts,.js}',
      ],
      synchronize: true,
    }),
  },
];
Notice the type is ‘mssql here. The other information corresponds to the specific mssql database being used.
Important also is the Synchronize setting. If this is set to true, TypeOrm will create tables like in a code-first approach. Also if the code and database objects are out of sync it will try to change constraints etc, so make sure this is only used in development.
An improvement could be to read the variables from config files.
In the Word entity class, attributes must be specified to let Type-Orm know how the fields correspond to database columns.
The providers will be exported in the module file Database.module.ts
import { Module } from '@nestjs/common';
import { databaseProviders } from './database.providers';

@Module({
  providers: [...databaseProviders],
  exports: [...databaseProviders],
})
export class DatabaseModule {}
import { PrimaryGeneratedColumn, Column, Entity } from "typeorm";

@Entity()
export class Word {

@PrimaryGeneratedColumn()
id: number;

@Column({ length: 200 })
word: string;

@Column({ nullable: true })
description: string;

@Column()
masculin: boolean;

@Column()
feminin: boolean;

constructor(word?: Partial<Word>) {
    Object.assign(this, word);
  }
}
The entity class corresponds to the database table to be created. The class itself has an @Entity attribute, the properties have the @Column attribute which are customizable. The id column which is the primary key requires the @PrimaryKeyGeneratedColumn attribute. Read the docs https://typeorm.io/#/entities to know more about this.
In the words folder, create word.providers.ts The word repository is provided here.
import { Connection, Repository } from 'typeorm';
import { Word } from './word.entity';

export const wordProviders = [
  {
    provide: 'WORD_REPOSITORY',
    useFactory: (connection: Connection) => connection.getRepository(Word),
    inject: ['DATABASE_CONNECTION'],
  },
];
Creating the service and controller class
The service class contains the repository and interacts with the database. It can be generated with the following nest command:
nest generate service words
The words.service.ts file is generated in the word folder.
import { Injectable, Inject } from '@nestjs/common';
import { Word } from './word.entity';
import { Repository } from 'typeorm';
import { WordDto } from './word.dto';

@Injectable()
export class WordsService {

    constructor(
        @Inject('WORD_REPOSITORY')
        private readonly wordsRepository: Repository<Word> ) {
    }

    async getWord(id?: number): Promise<Word> {
        return await this.wordsRepository.findOne(id);
    }

    async getWords(): Promise<Word[]> {
        return await this.wordsRepository.find();;
    }

    async getRandomWords(): Promise<Word[]> {
        return this.wordsRepository.createQueryBuilder("word")
        .getMany();
    }

    async createGameWord(wordData: Partial<WordDto>): Promise<Word> {
        let word = new Word();
        word.word = wordData.word;
        word.description = wordData.description;
        word.masculin = wordData.masculin;
        word.feminin = wordData.feminin;

        return await this.wordsRepository.save(word);
    }
}
The word repository is injected here. Note also the ‘createQueryBuilder()’ method. With this method SQL queries can be build with typical SQL constructs. The TypeORM library doesn’t support native Sql Server functions. This means that if your query requires a function being called like GETDATE() or any other, use the createQueryBuilder.query() function.
A dto class is created to pass to the POST method of the controller. word.dto.ts
export class WordDto {
    word: string;
    description: string;
    masculin: boolean;
    feminin: boolean;
}
The controller is modified with a few methods, among it a ‘getRandomWords()’ method for retrieving words and a POST method for adding words. words.controller.ts
import { Controller, Get, Post, Body, Param, NotFoundException } from '@nestjs/common';
import { Word } from './word.entity';
import { WordsService } from './words.service';
import { WordDto } from './word.dto';

@Controller('words')
export class WordsController {

  constructor(
    private readonly wordsService: WordsService,
  ) {
  }

  @Get()
  async getWords(): Promise<Word[]> {
    return await this.wordsService.getWords();
  }

  @Get('random')
  async getTenWords(): Promise<Word[]> {
    return await this.wordsService.getRandomWords();
  }

  @Get(':id')
  async getWord(@Param('id') id): Promise<Word> {
    try {
      return await this.wordsService.getWord(id);
    } catch (error) {
      throw new NotFoundException(error);
    }
  }

  @Post()
  async postWord(@Body() wordData: Partial<WordDto>) {
    return await this.wordsService.createGameWord(wordData);
  }
}
words.module.ts
import { Module } from '@nestjs/common';
import { DatabaseModule } from '../database/database.module';
import { wordProviders } from './word.providers';
import { WordService } from './word.service';

@Module({
  imports: [DatabaseModule],
  providers: [
    ...wordProviders,
    WordService,
  ],
})
export class WordModule {}
Adding database entries
The game needs words to guess. They could be added with SQL statements, but in this case they will be added by running the function app locally, and call the POST method with curl. Start the local function with ‘npm run start:azure’ and execute the following lines on the terminal.
curl http://localhost:7071/api/words/  -X POST   -H "content-type: application/json"   -d '{ "word": "coude", "description": "elbow", "masculin": true, "feminin": false }'
curl http://localhost:7071/api/words/  -X POST   -H "content-type: application/json"   -d '{ "word": "jardin", "description": "garden", "masculin": true, "feminin": false }'
curl http://localhost:7071/api/words/  -X POST   -H "content-type: application/json"   -d '{ "word": "point", "description": "point", "masculin": true, "feminin": false }'
curl http://localhost:7071/api/words/  -X POST   -H "content-type: application/json"   -d '{ "word": "ville", "description": "town", "masculin": false, "feminin": true }'
curl http://localhost:7071/api/words/  -X POST   -H "content-type: application/json"   -d '{ "word": "maison", "description": "house", "masculin": false, "feminin": true }'
curl http://localhost:7071/api/words/  -X POST   -H "content-type: application/json"   -d '{ "word": "vin", "description": "wine", "masculin": true, "feminin": false }'
curl http://localhost:7071/api/words/  -X POST   -H "content-type: application/json"   -d '{ "word": "cantine", "description": "canteen", "masculin": false, "feminin": true }'
curl http://localhost:7071/api/words/  -X POST   -H "content-type: application/json"   -d '{ "word": "femme", "description": "lady", "masculin": false, "feminin": true }'
curl http://localhost:7071/api/words/  -X POST   -H "content-type: application/json"   -d '{ "word": "ordinateur", "description": "computer", "masculin": true, "feminin": false }'
curl http://localhost:7071/api/words/  -X POST   -H "content-type: application/json"   -d '{ "word": "acceptation", "description": "acceptation", "masculin": false, "feminin": true }'
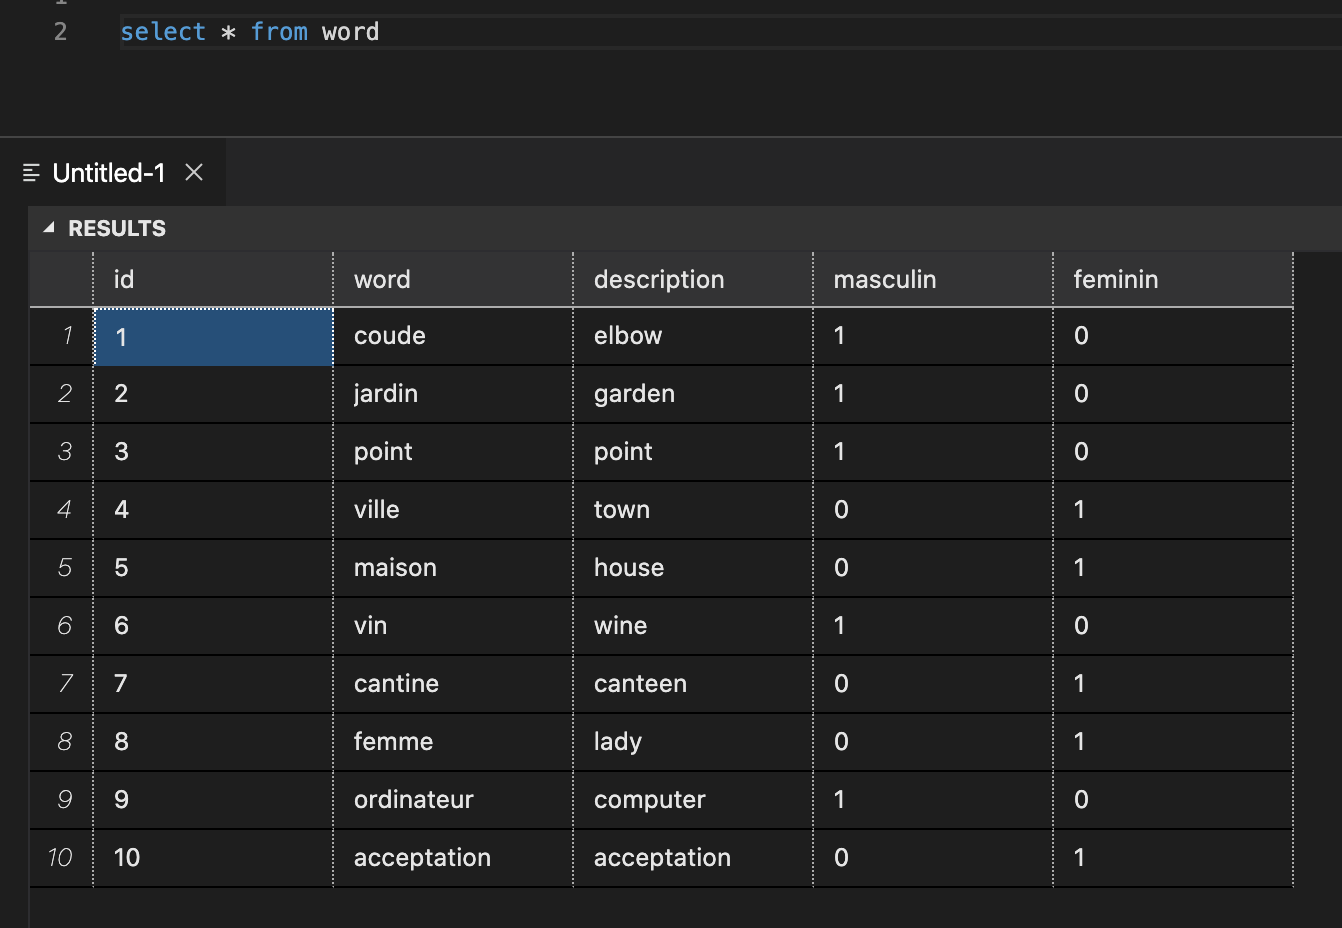
The database table in the Azure Portal now looks like this:
Start the function locally again with the command ‘‘npm run start:azure’ in the root folder of the func project.
If the statement curl http://localhost:7071/api/words/ returns the words from the database, the api function can be re-deployed now to Azure:
func azure functionapp publish api-func-lela --publish-local-settings
Creating the Angular front-end
An angular front-end with a word guessing engine is implemented. The source code for the clientapp can be found in the github repo under the lela-client folder.
Note that with curl (with the -X flag) the our api function could be accessed. With the client angular app this is different. Running the angular client app locally (pointing to the local function) the following error will popup:

The reason for this is that the browser will check the Cross-origin resource sharing (CORS) settings of the server. The solution is to modify the local.settings.json file locally to allow all domains:
{
  "IsEncrypted": false,
  "Values": {
    "FUNCTIONS_WORKER_RUNTIME": "node"
  },
  "Host": {
    "LocalHttpPort": 7071,
    "CORS": "*"
  }
}
More information about this local.settings.json file can be read on this Microsoft page
If the client app works locally, the url to the function app can be changed in the client app to the url of the Azure Function.
The Cors setting of the deployed Azure Function can also be set to make it accessible from localhost:
az functionapp cors add --name [my-func-app-name] \
--resource-group [rg-mygroup] \
--allowed-origins http://localhost:4200
Another way to do this is in the Azure portal (Navigate to the function -> platform features -> Cors).
Deploy the front-end to Azure
To make the example complete the front-end should be deployed to Azure. This can be done as an Azure app, but another cheaper way is to just deploy it as a static website to a blob-storage in an Azure storage account.
First thing to do is to add the @azure/ng-deploy package and configure it with the target Azure resource group and Azure storage account.
ng add @azure/ng-deploy --resourceGroup [rg-mygroup] --account [stmystorage]
After this is deployment is made easy, by stating the command:
ng deploy
The web client is deployed now and the url with the client app location is in the following form: https://[func-app-name].[xx].web.core.windows.net
The client app will work after updating the CORS settings of the function app:
az functionapp cors add --name [my-func-app-name] \
--resource-group [rg-mygroup] \
--allowed-origins https://[func-app-name].[xx].web.core.windows.net
The example client app looks like this:
Conclusion
This article showed how NestJs can be used to create a serverless Azure Functions application. A NestJs application is created, which can run locally as a Azure Function, and can be deployed to Azure. Using TypeOrm a cloud database can be added, and with a TypeScript front-end it results in a serverless cloud solution built with just one programming language!